Tessellate 3D Scanner
A vision based 3D scanner utilizing structured light to generate meshes.
I built this project with my friends Suneel and Nathan for UC Berkeley’s hackathon: Cal Hacks, one of the largest collegiate hackathons in the world. The event featured 1,700 hackers from 100 schools and 5 countries building projects for 36 straight hours. It was an incredible experience, and a very professionally run event. After we submitted and presented our work, we found out that we were one of six teams to win the Cal Hacks fellowship award.
The Cal Hacks Fellowship
Why do you have to stop when the hackathon is over? We’re introducing the Cal Hacks Fellowship, a program that accepts 5 hackathon teams to continue their projects beyond the hackathon. We plan to continue improving your project and move it past its initial stage so you can continue adding onto it, while receiving the same support from a hackathon.
This includes: One-on-one director mentorship, Work with industry professionals and venture capitalists, Receive support from The House Founders program, Gain access to future hack nights and unlimited amount of free resources.
- calhacks.io
We were given $1000 to continue building our project out as far as we’d like. Suneel, Nathan, and I have plenty of ideas as to how to best use this money to turn our weekend project into a useful tool. Our original Cal Hacks submission for the project can be found on DevPost. Also, the directors of Cal Hacks wrote a Medium article about the motivation behind the Cal Hacks Fellowship.
Inspiration
3D Printing offers quick and easy access to a physical design from a digitized mesh file. Transferring a physical model back into a digitized mesh is much less accessible in a desktop platform. We sought to create our own desktop 3D scanner that could generate high fidelity, colored and textured meshes for 3D printing or including models in computer graphics.
The Build
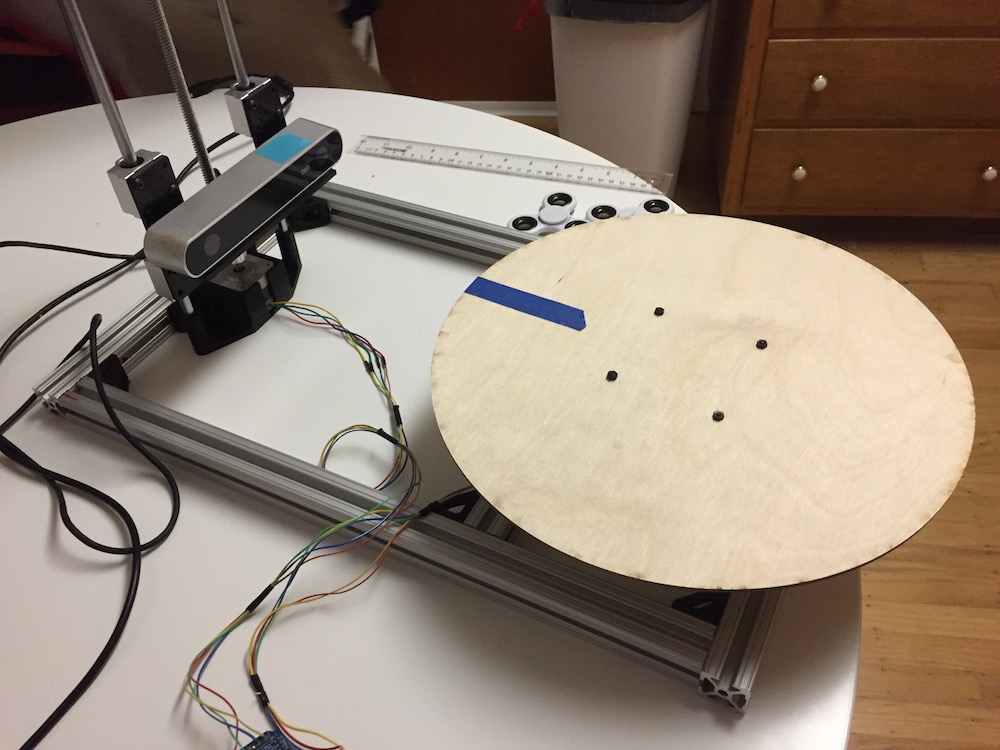
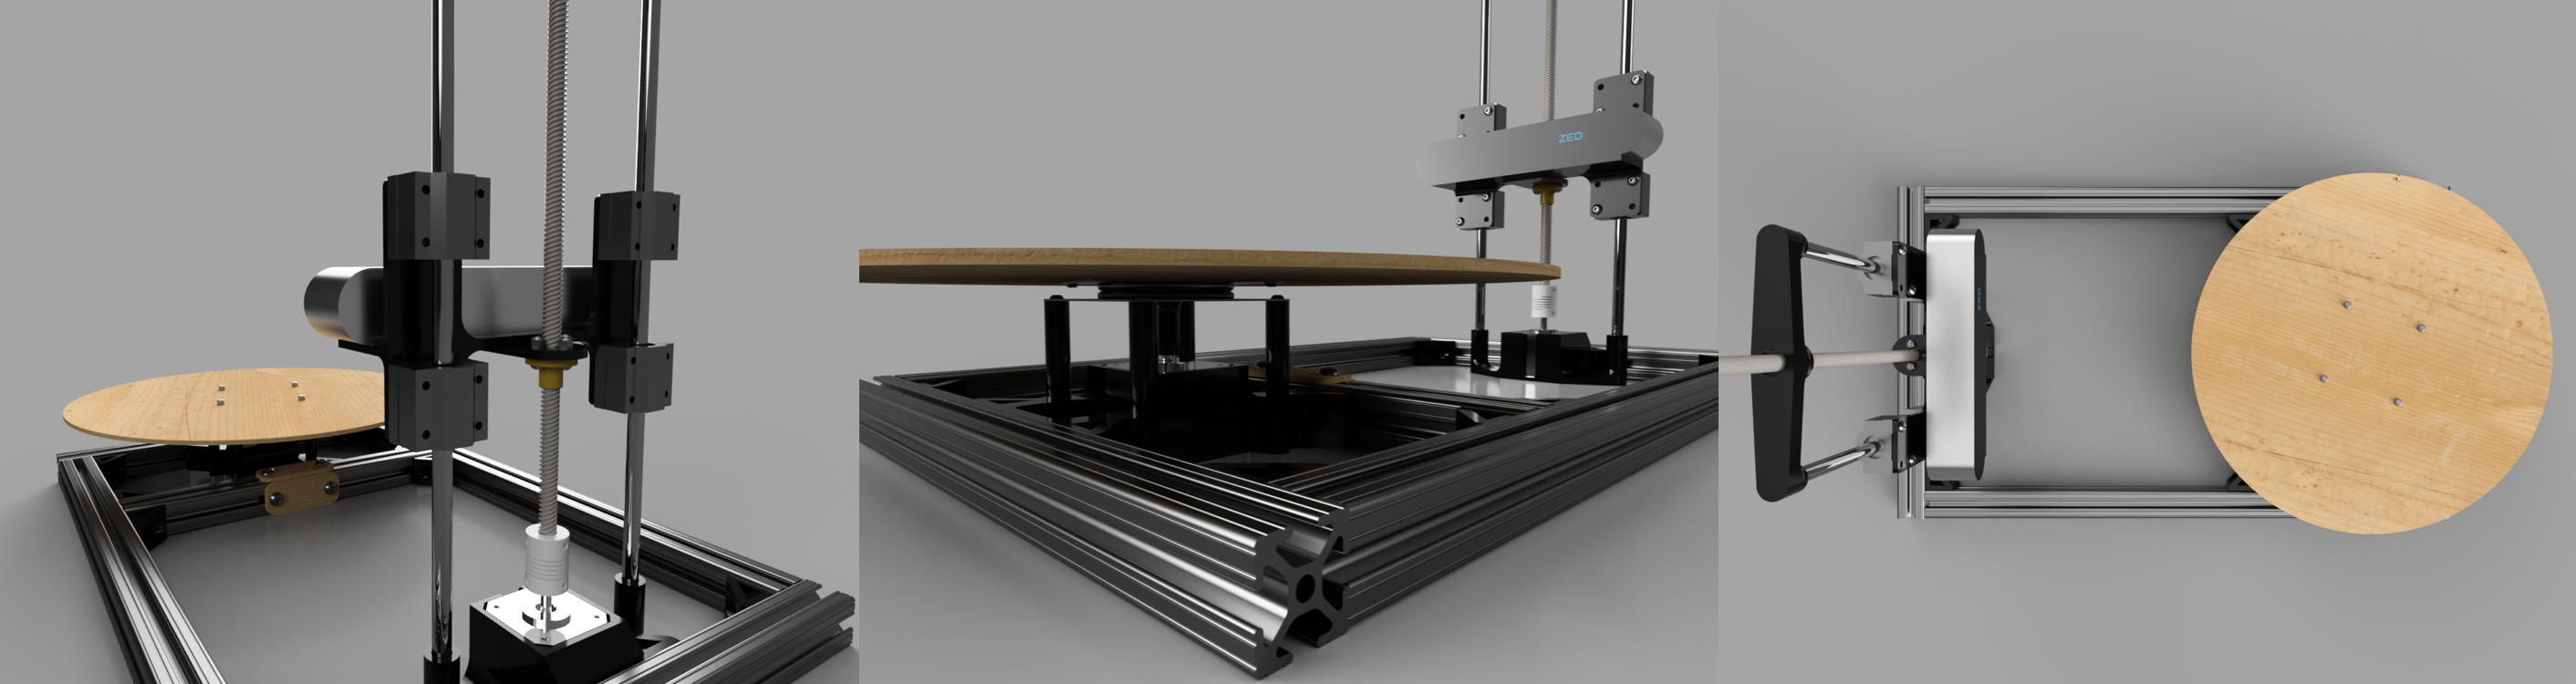
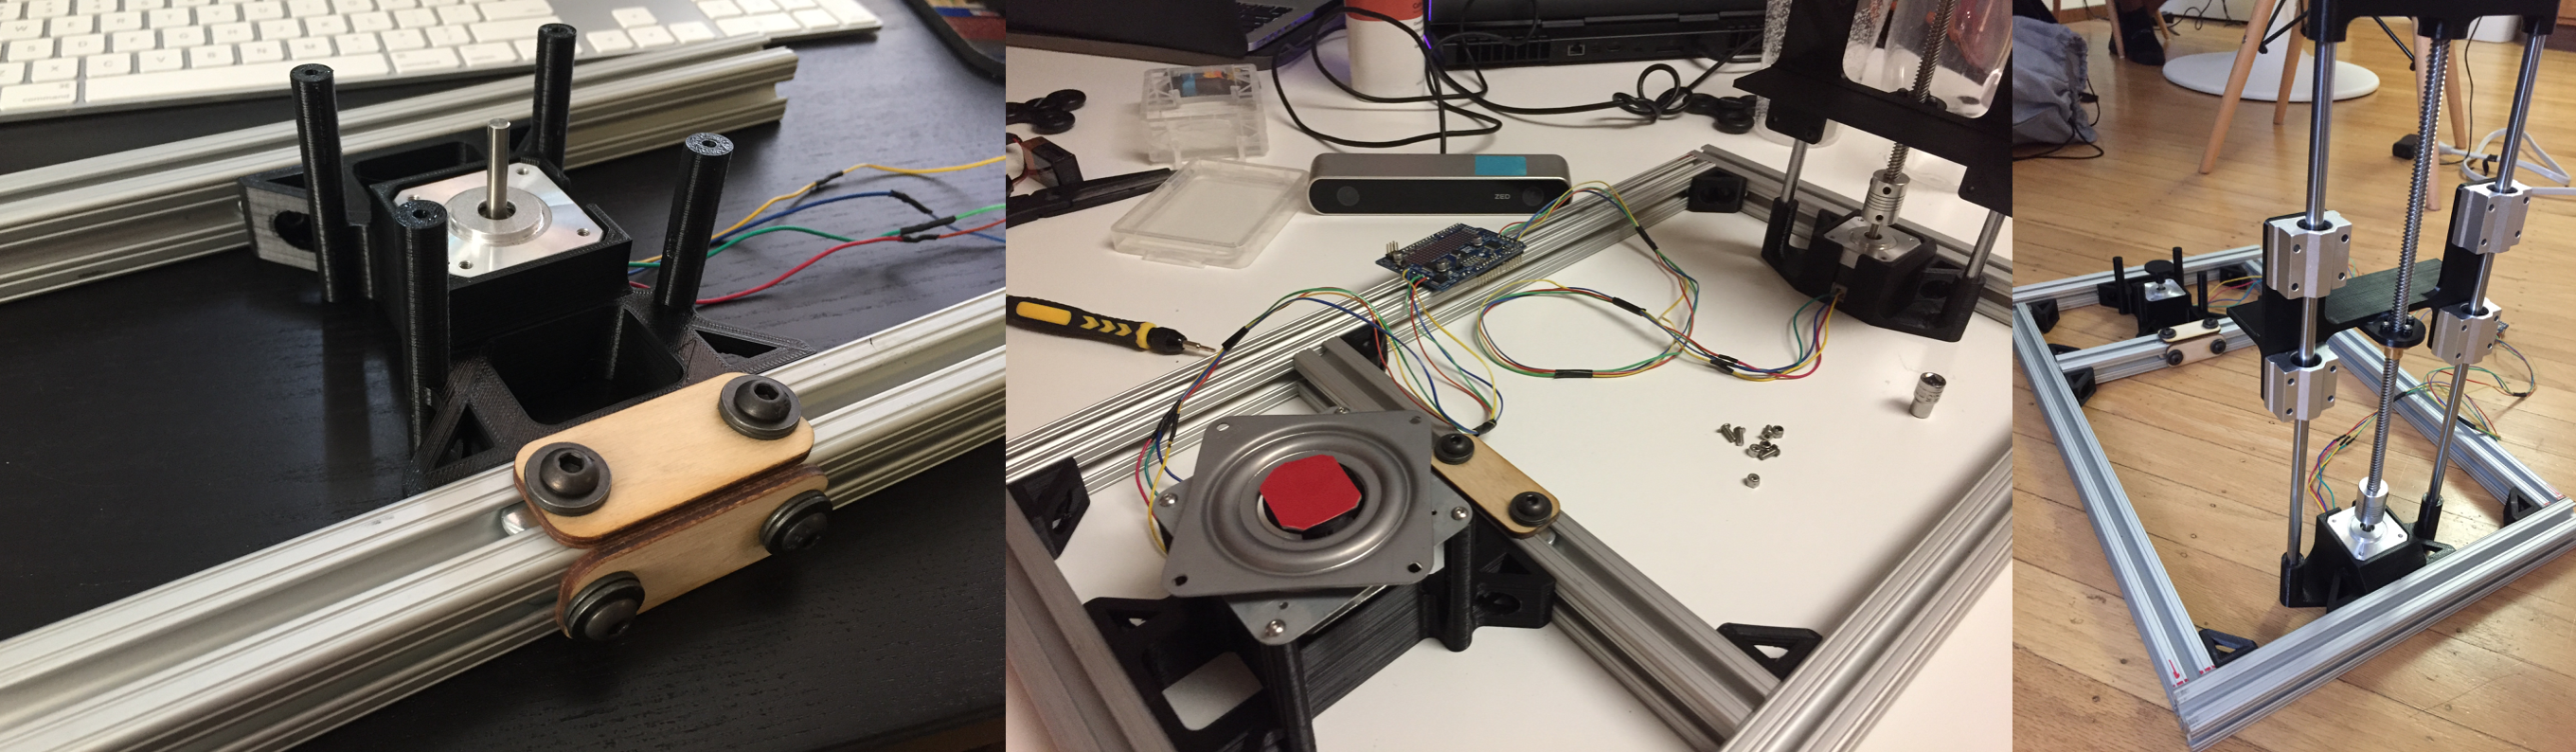
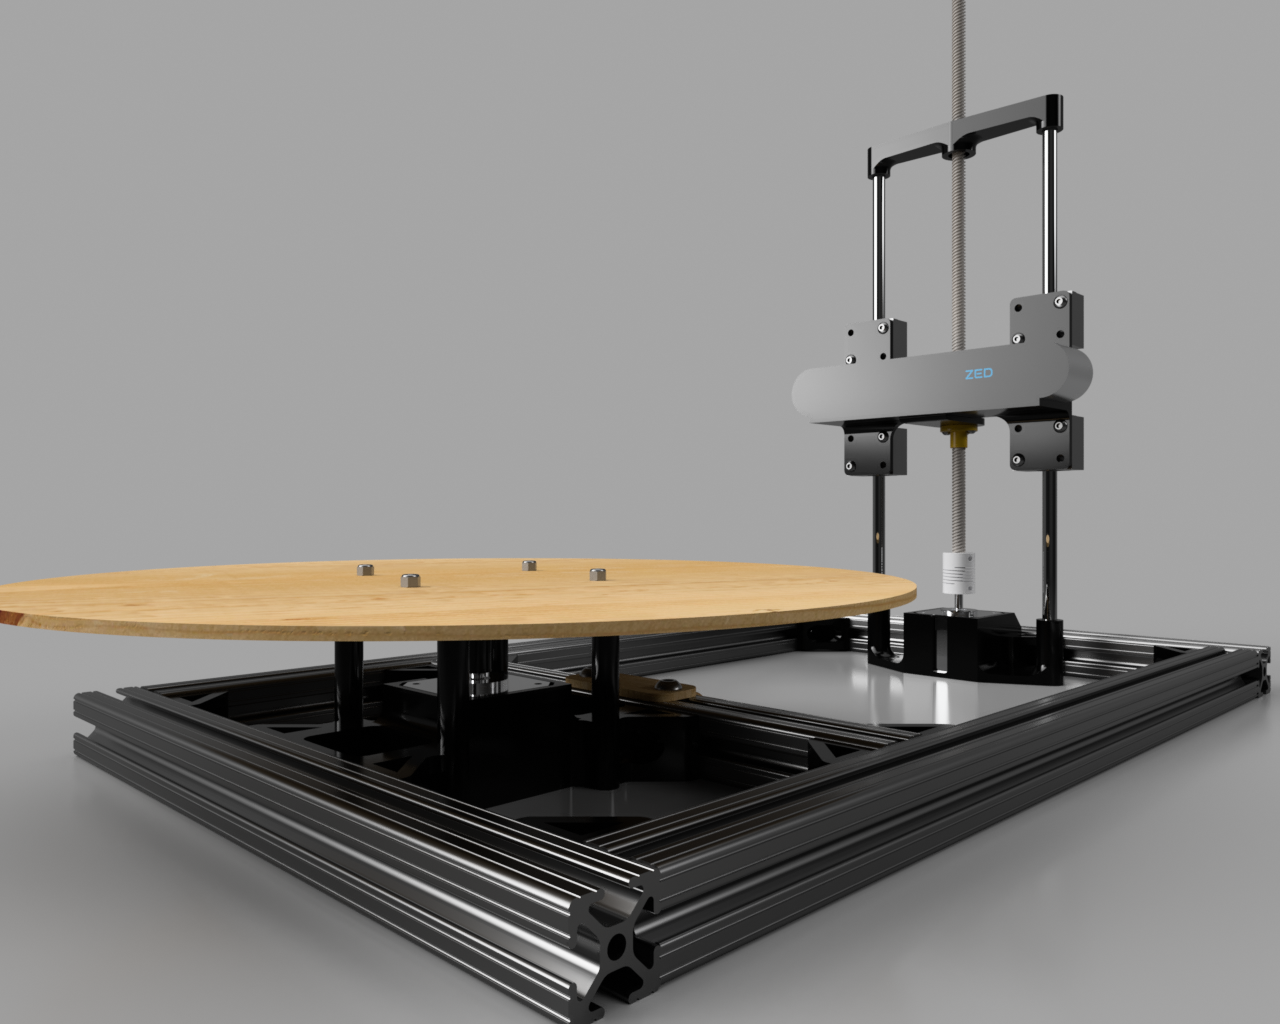
The rig uses a ZED stereo camera driven by a ROS wrapper to take stereo images at various known poses in a spiral which is executed with precision by two stepper motors driving a leadscrew elevator and a turn table for the model to be scanned. We designed the entire build in a high detail CAD using Autodesk Fusion 360, 3D printed L-brackets and mounting hardware to secure the stepper motors to the T-slot aluminum frame we cut at the metal shop at Jacobs Hall. There are also 1/8th inch wood pieces that were laser cut at Jacobs, including the turn table itself. We designed the power system around an Arduino microcontroller and an Adafruit motor shield to drive the steppers. The Arduino and the ZED camera are controlled by python over a serial port and a ROS wrapper respectively to automate the process of capturing the images used as an input to OpenMVG/MVS to compute dense point clouds and eventually refined meshes.
Challenges
We ran into a few minor mechanical design issues that were unforeseen in the CAD, luckily we had access to a 3D printer throughout the entire weekend and were able to iterate quickly on the tolerancing of some problematic parts. Issues with the AccelStepper library for Arduino used to simultaneously control the velocity and acceleration of 2 stepper motors slowed us down early Sunday evening and we had to extensively read the online documentation to accomplish the control tasks we needed to. Lastly, the complex 3D geometry of our rig (specifically rotation and transformation matrices of the cameras in our defined world coordinate frame) slowed us down and we believe may still problematic.
Future Improvements
We’re proud of the mechanical design and fabrication, actuator precision, and data collection automation we achieved in just 36 hours. The outputted point clouds and meshes are still being improved. This is a result of the ZED stereo camera we used, it wasn’t the right camera for the job as it is optimized for depth sensing up to 20m away, not 20cm away as in our build. It did however have an awesome advantage in that we could control it through ROS, so automating the activation of the camera through a python script was easy.
With the money we won at the hackathon, we are planning on purchasing an Nvidia TX2, to integrate all the automation and mesh construction onto an embedded platform that can be carried with the scanner. Also, we’ll purchase an XBox Kinect camera and try to rebuild around using IR depth sensing rather than photogrammetry. This method has been proven specifically for this close-range application and we’re hoping to generate our first usable mesh during the Spring 2018.
Built With
- OpenMVG
- Arduino
- Python
- ZED from Stereolabs
- ROS
- CUDA